Part 1: Deploying ClusterFactory
Overview
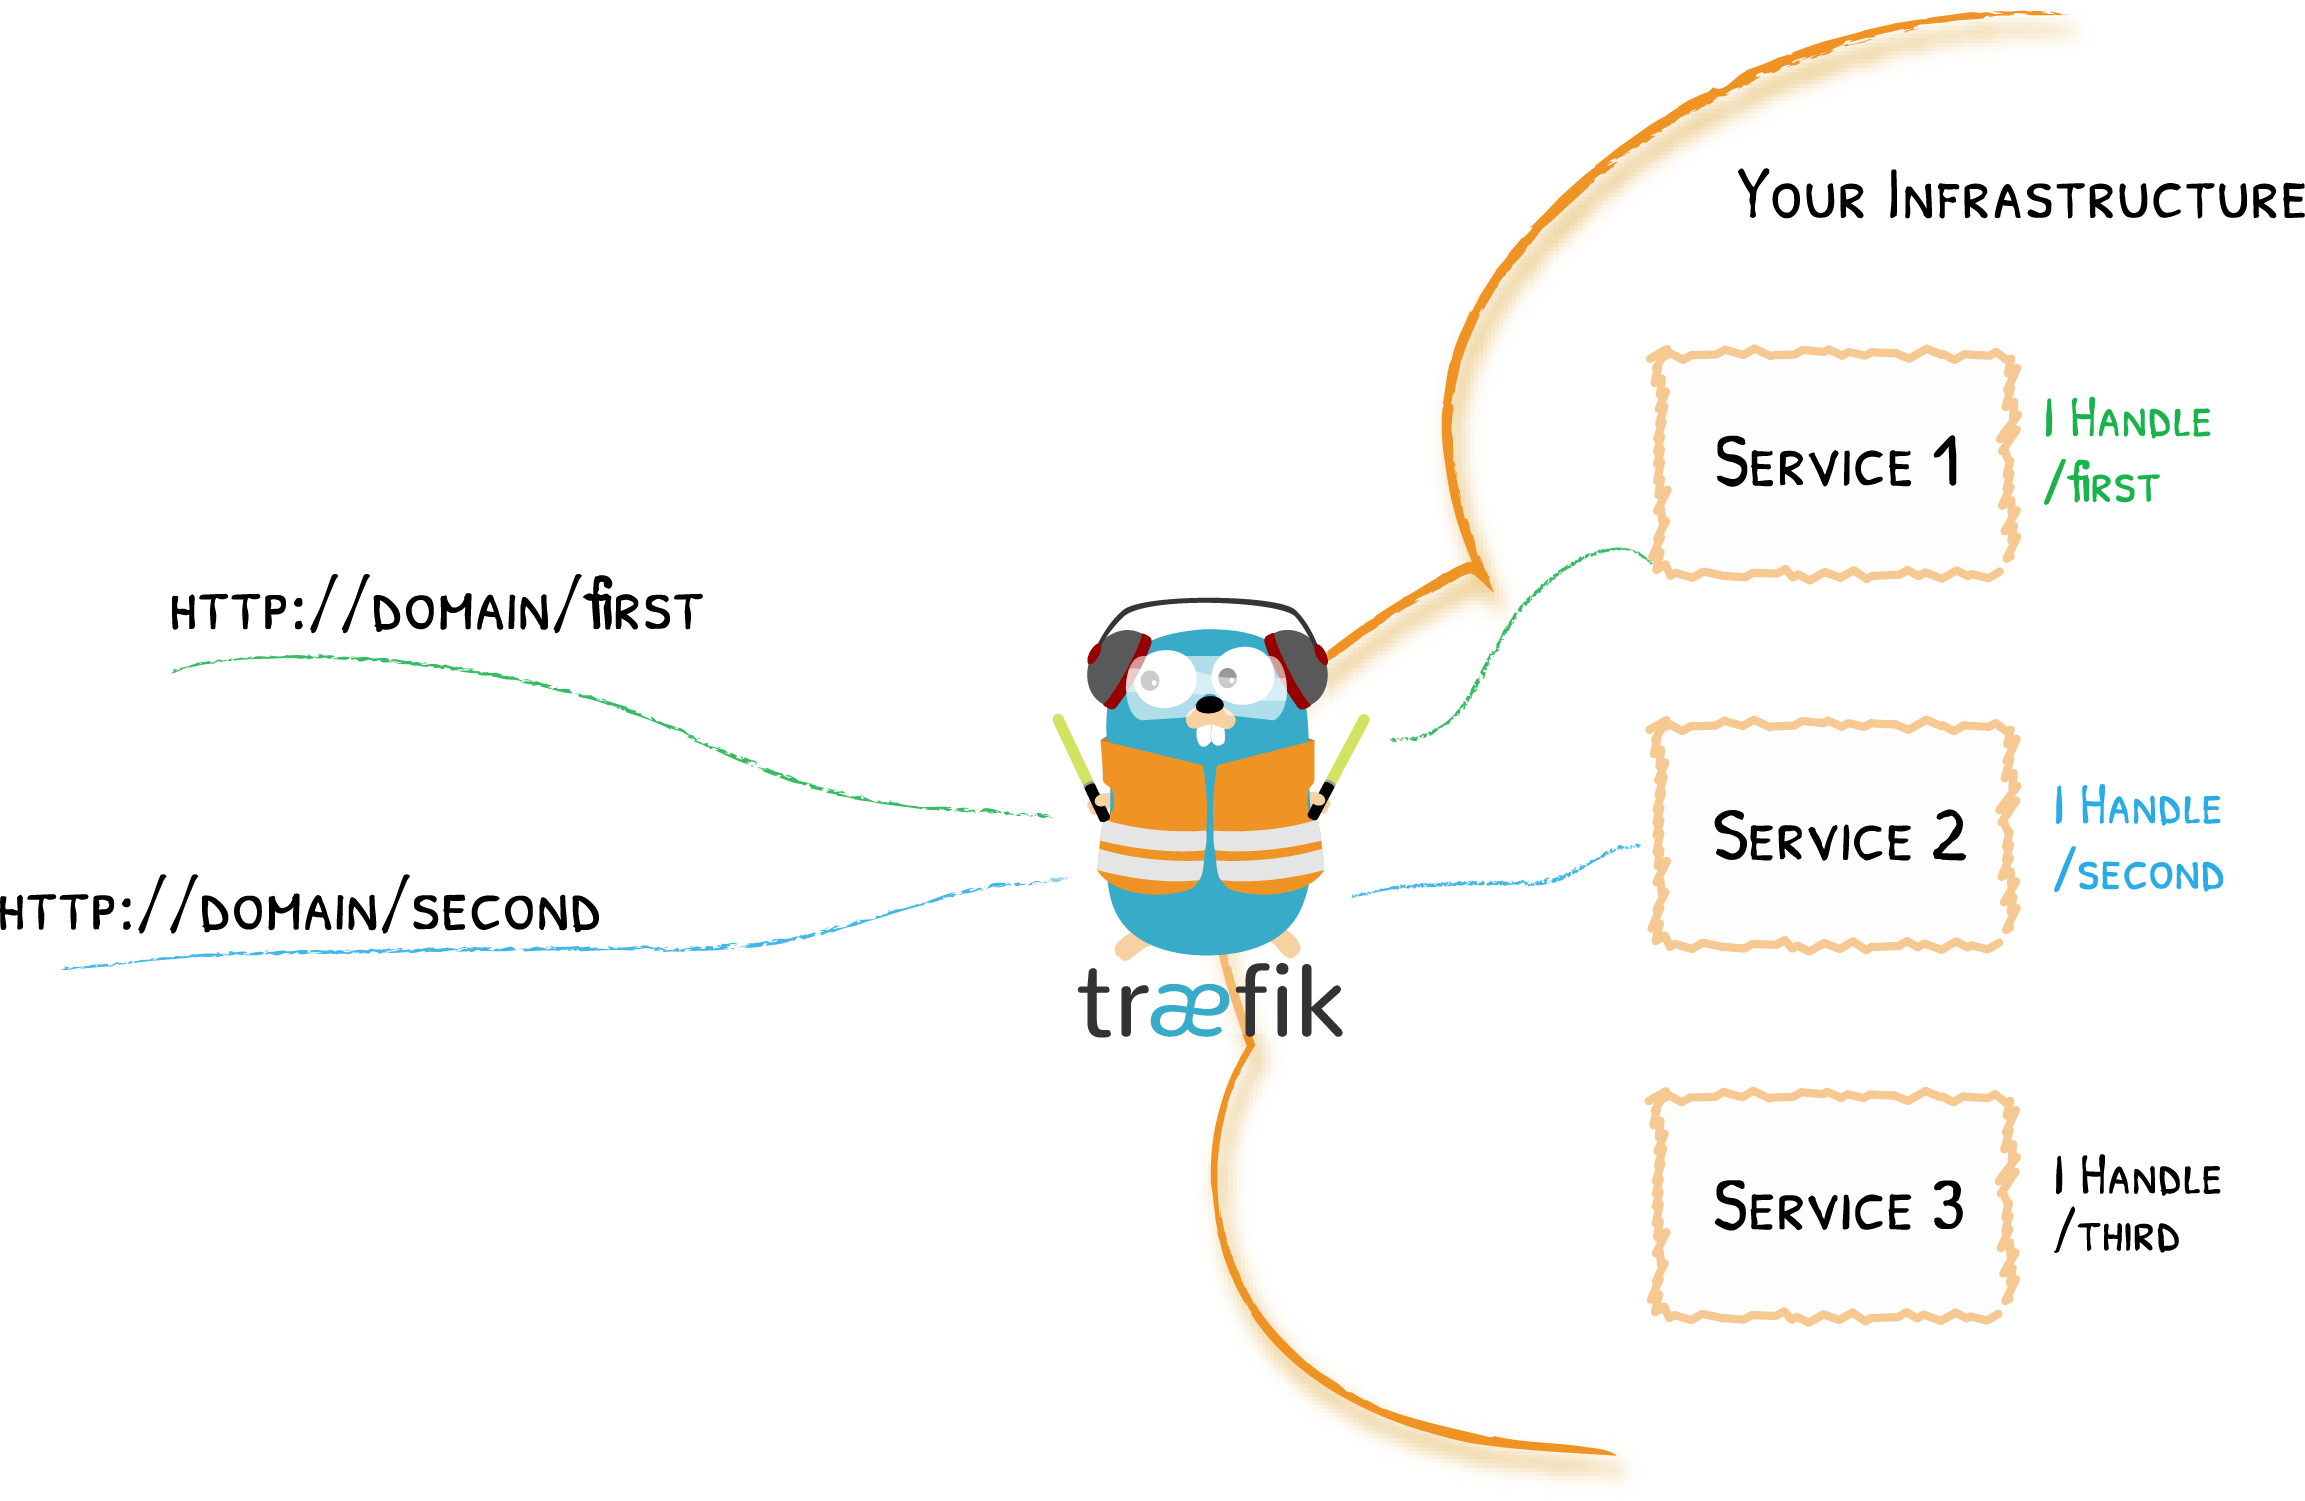
Assuming the infrastructure look like this:

1. Setup the repository for GitOps
a. Create a private fork
We will create a private fork.
-
Create a bare clone of the ClusterFactory repository.
user@local:/git clone --bare https://github.com/deepsquare-io/ClusterFactory.git -
Create a new private repository on your favorite Git hosting website and name it
ClusterFactory. This repository will be tracked by ArgoCD and will represent the state of your infrastructure. -
Mirror-push your bare clone to your new
ClusterFactoryrepository.user@local:/cd ClusterFactory.git
# SSH
git push --mirror git@github.com:<your account>/ClusterFactory.gitYou've pushed a copy of ClusterFactory to you repository.
-
Remove the bare clone since we don't need it anymore.
user@local:/ClusterFactory.gitcd ..
rm -rf ./ClusterFactory.git -
You can now clone your
ClusterFactoryrepository on your machine.user@local:/# SSH
git clone git@github.com:<your account>/ClusterFactory.git
b. Track the upstream remote repository
Git is capable of managing multiple remote repositories. By default, origin is linked to the <your account>/ClusterFactory repository. To be able to fetch updates from the upstream deepsquare-io/ClusterFactory repository, we need to add a remote repository that we call upstream.
-
Add the upstream and disable push on the remote
upstream:user@local:/ClusterFactorygit remote add upstream https://github.com/deepsquare-io/ClusterFactory.git
git remote set-url --push upstream DISABLE -
You can list all your remotes with
git remote -v:user@local:/ClusterFactorygit remote -v
# origin git@github.com:<your account>/ClusterFactory.git (fetch)
# origin git@github.com:<your account>/ClusterFactory.git (push)
# upstream https://github.com/deepsquare-io/ClusterFactory.git (fetch)
# upstream DISABLE (push)
You can then update your repository from the upstream repository by doing:
git fetch upstream
git merge upstream/main
c. (Optional) Checkout to a stable version and create a new branch
You can checkout to a stable version:
git checkout -b configs <CF version>
Please note that ClusterFactory is under heavy development, it is strongly recommended to follow the latest version of ClusterFactory.
Unannounced breaking changes are to be expected.
d. Rename the examples and commit
Copy argo.example, core.example, cfctl.yaml.example, and remove the .example:
cp -R argo.example/ argo/
cp -R core.example/ core/
cp cfctl.yaml.example cfctl.yaml
You can track these files on Git:
git add .
git commit -m "Initialized my config"
2. Configure and deploy with cfctl
The documentation for this section is here. Edit the cfctl.yaml file:
-
Provide each host a valid IP address that is reachable by cfctl, and the connection details for an SSH connection. You can also change the
labelsto match with your region and zone.ctctl.yamlapiVersion: cfctl.clusterfactory.io/v1beta1
kind: Cluster
metadata:
name: k8s.example.com-cluster
spec:
hosts:
- ssh:
address: 192.168.0.2
user: root
port: 22
keyPath: ~/.ssh/id_ed25519
role: controller+worker
noTaints: true
privateInterface: eno1
privateAddress: 192.168.0.2
installFlags:
- --debug
- --labels="topology.kubernetes.io/region=ch-sion,topology.kubernetes.io/zone=ch-sion-1"
- --disable-components coredns
hooks:
apply:
before:
# Set SELinux Permissive
- sh -c 'if [ "$(getenforce)" != "Permissive" ] && [ "$(getenforce)" != "Disabled" ]; then sed -i s/^SELINUX=.*$/SELINUX=permissive/ /etc/selinux/config; fi'
- sh -c 'if [ "$(getenforce)" != "Permissive" ] && [ "$(getenforce)" != "Disabled" ]; then setenforce 0; fi' -
Change the Cluster configuration. Most of the settings are already correct, so just change the
nameof the cluster.ctctl.yamlspec:
# ...
k0s:
version: '1.27.1+k0s.0'
dynamicConfig: false
config:
apiVersion: k0s.k0sproject.io/v1beta1
kind: ClusterConfig
metadata:
name: k8s.example.com
spec:
api:
k0sApiPort: 9443
port: 6443
installConfig:
users:
etcdUser: etcd
kineUser: kube-apiserver
konnectivityUser: konnectivity-server
kubeAPIserverUser: kube-apiserver
kubeSchedulerUser: kube-scheduler
konnectivity:
adminPort: 8133
agentPort: 8132
network:
calico:
mode: 'vxlan'
overlay: Always
mtu: 0
wireguard: false
kubeProxy:
disabled: false
mode: iptables
kuberouter:
autoMTU: true
mtu: 0
peerRouterASNs: ''
peerRouterIPs: ''
podCIDR: 10.244.0.0/16
provider: calico
serviceCIDR: 10.96.0.0/12
podSecurityPolicy:
defaultPolicy: 00-k0s-privileged
storage:
type: etcd
telemetry:
enabled: false -
Deploy:
user@local:/ClusterFactory. ./scripts/setup-env # This download all the necessary utilities
cfctl apply --debug -
Fetch the kubeconfig and load it:
user@local:/ClusterFactorycfctl kubeconfig --config ./cfctl.yaml >./kubeconfig
chmod 600 ./kubeconfig
export KUBECONFIG=$(pwd)/kubeconfig
You will need to export KUBECONFIG=$(pwd)/kubeconfig each time you open a new terminal, or you can add the config to you ~/.kube/config.
3. Configure and deploy the core
a. Configure MetalLB
MetalLB is the IP advertizer for the LoadBalancer services. It attaches IP to the Kubernetes LoadBalancer services and announce it to the whole network and router.

For the sake of simplicity, we will use the ARP (L2) method. Do note that BGP (L3) method offers a true Load-Balancing behavior. You can follow this guide to deploy with BGP.
-
Configure the IPs to be advertized. Edit the
IPAddressPoolin the filecore/metallb/address-pools.yaml:core/metallb/address-pools.yamlapiVersion: metallb.io/v1beta1
kind: IPAddressPool
metadata:
name: main-pool
namespace: metallb
spec:
addresses:
- 192.168.0.100/32
---
apiVersion: metallb.io/v1beta1
kind: IPAddressPool
metadata:
name: slurm-controller-example-1-pool
namespace: metallb
spec:
addresses:
- 192.168.0.4/32
---
apiVersion: metallb.io/v1beta1
kind: IPAddressPool
metadata:
name: slurm-login-example-1-pool
namespace: metallb
spec:
addresses:
- 192.168.0.5/32 -
Configure MetalLB to use ARP (L2) to advertize the IP:
core/metallb/address-pools.yamlapiVersion: metallb.io/v1beta1
kind: L2Advertisement
metadata:
name: l2-advertisement
namespace: metallb
spec:
ipAddressPools:
- main-pool
- slurm-controller-example-1-pool
- slurm-login-example-1-pool
Notice that addresses is inside our 192.168.0.0/24 subnet. This is so that we don't need to create a route from the router. If you want to use an IP outside this range, use BGP or L2 with a static route.
b. Configure Traefik
Traefik is the main L7 load balancer and entrypoint. HTTP, TCP and UDP traffic will go through here and will be routed to the right Kubernetes Services based on rules.
-
Edit the
core/traefik/values.yamlfile. Attach the MetalLB IP to traefik by adding the annotations:core/traefik/values.yamlservice:
enabled: true
annotations:
metallb.universe.tf/address-pool: main-pool
metallb.universe.tf/allow-shared-ip: traefik-lb-key
spec:
externalTrafficPolicy: Cluster # Load Balance horizontally via MetalLB too -
Add the following ports:
core/traefik/values.yamlports:
traefik:
port: 9000
expose: true
exposedPort: 9000
protocol: TCP
dns-tcp:
port: 8053
expose: true
exposedPort: 53
protocol: TCP
dns-udp:
port: 8054
expose: true
exposedPort: 53
protocol: UDP
ldap:
port: 389
expose: true
exposedPort: 389
protocol: TCP
ldaps:
port: 636
expose: true
exposedPort: 636
protocol: TCP
web:
port: 80
expose: true
exposedPort: 80
protocol: TCP
websecure:
port: 443
expose: true
exposedPort: 443
protocol: TCP
# You MUST open port 443 UDP!
# HTTP3 upgrades the connection from TCP to UDP.
http3:
enabled: true
tls:
enabled: true
metrics:
port: 9100
expose: false
exposedPort: 9100
protocol: TCP
Traefik will expose the LDAP ports, HTTP ports and DNS ports.
c. CoreDNS configuration
CoreDNS uses hostPort, meaning you can access to the DNS via either Traefik (192.168.0.100) or the Kubernetes nodes (192.168.0.2). Make sure that the systemd-resolved sub listener is disabled. Open the /etc/systemd/resolved.conf configuration file on the Kubernetes hosts and disable the stub listener by setting DNSStubListener to no. Finally, restart the service with systemctl restart systemd-resolved.service.
To configure CoreDNS, you have to look for these two files: core/coredns/overlays/prod/configmap.yaml and core/coredns/overlays/prod/daemonset.yaml.
Replace the examples of the ConfigMap with:
apiVersion: v1
kind: ConfigMap
metadata:
  name: coredns
  namespace: kube-system
  labels:
    k0s.k0sproject.io/stack: coredns
data:
  Corefile: |
    .:53 {
      errors
      health {
        lameduck 5s
      }
      ready
      kubernetes cluster.local in-addr.arpa ip6.arpa {
        pods insecure
        fallthrough in-addr.arpa ip6.arpa
        ttl 30
      }
      prometheus :9153
      forward . 8.8.8.8
      cache 30
      loop
      reload
      loadbalance
      }
      internal:53 {
        log
        errors
        ready
        hosts /etc/coredns/internal.db
        reload
      }
      example.com:53 {
        log
        errors
        ready
        hosts /etc/coredns/example.com.db
        reload
      }

  internal.db: |
    192.168.0.100 traefik.internal
    192.168.0.100 argocd.internal

  example.com.db: |
    192.168.0.100 ldap.example.com
    192.168.0.100 cvmfs.example.com
    192.168.0.100 ipmi.example.com
    192.168.0.100 supervisor.example.com

    192.168.0.2 mn1.example.com
    192.168.0.3 grendel.example.com
    192.168.0.4 slurm-cluster-satoshi-1-controller-0.example.com
    192.168.0.5 slurm-cluster-satoshi-1-login.example.com

    192.168.0.51 cn1.example.com
Our routes for external-to-pod communications will look like this:

If you plan to rename example.com.db into your your.domain.db, don't forget to change the daemonset.yaml too:
        volumes:
          - name: config-volume
            configMap:
              name: coredns
              items:
                - key: Corefile
                  path: Corefile
-               - key: example.com.db
-                 path: example.com.db
                - key: internal.db
                  path: internal.db
+               - key: your.domain.db
+                 path: your.domain.db
              defaultMode: 420
Modify the zones with your own custom ones and update the forward field with your preferred DNS.
d. Configure the cert-manager issuers
We are going to use our own Certificate Authority (CA) for all of our services.
-
Create a Secret
ca-key-pair. To generate a TLS certificate and its private key:openssl genrsa -out tls.key 2048
openssl req -x509 -sha256 -new -nodes -key tls.key -days 3650 -out tls.crt
kubectl create secret tls ca-key-pair -n cert-manager --cert=tls.crt --key=tls.key
rm ca-key-pair-secret.yaml -
Then, create a private ClusterIssuer:
core/cert-manager/private-cluster-issuer.yamlapiVersion: cert-manager.io/v1
kind: ClusterIssuer
metadata:
name: private-cluster-issuer
namespace: cert-manager
spec:
ca:
secretName: ca-key-pair -
Edit the production ClusterIssuer if you want to expose Kubernetes Services to the Internet with TLS:
core/cert-manager/production-cluster-issuer.yamlapiVersion: cert-manager.io/v1
kind: ClusterIssuer
metadata:
name: production-cluster-issuer
namespace: cert-manager
spec:
acme:
email: john.smith@example.com
server: https://acme-staging-v02.api.letsencrypt.org/directory
privateKeySecretRef:
name: production-cluster-issuer-account-key
solvers:
- http01:
ingress:
class: traefik
The production ClusterIssuer will contact the ACME servers to generate public TLS certificates on trusted root CA servers.
e. (Optional) Configure the ArgoCD certificate
You can configure the ArgoCD certificate by editing the core/argo-cd/certificate.yaml file:
apiVersion: cert-manager.io/v1
kind: Certificate
metadata:
  name: argocd.internal-cert
  namespace: argocd
spec:
  secretName: argocd.internal-secret
  issuerRef:
    name: selfsigned-cluster-issuer
    kind: ClusterIssuer
  commonName: argocd.internal
  duration: 43800h
  subject:
    countries: [CH]
    localities: [Lonay]
    organizationalUnits: []
    organizations: [Example Org]
    postalCodes: ['1027']
    provinces: [Laud]
    streetAddresses: [Chemin des Mouettes 1]
  dnsNames:
    - argocd.internal
  emailAddresses:
    - john.smith@example.com
  privateKey:
    size: 4096
    algorithm: RSA
f. Deploy the core
Run the ./scripts/deploy-core script:
. ./scripts/setup-env # This download all the necessary utilities
export KUBECONFIG=$(pwd)/kubeconfig
./scripts/deploy-core
Don't hesitate to run it again if it crashes. This won't and will never harm the cluster.
This should deploy:
- Traefik
- CoreDNS
- MetalLB
- MultusCNI
- sealed-secrets
- cert-manager
- ArgoCD
If CoreDNS and the IngressRoutes are configured, you should be able to access the ArgoCD dashboard and Traefik dashboard via traefik.internal and argocd.internal, and by changing your DNS configuration to either 192.168.0.100 (Traefik) or 192.168.0.2 (Kubernetes Node).
On Linux, you should change the /etc/resolv.conf, like so:
search example.com
nameserver 192.168.0.2
What's next
We've deployed a Kubernetes Cluster! To join the grid, you must deploy our software stack. This includes:
- 389ds
- The DeepSquare Provider LDAP connector
- MariaDB
- The SLURM cluster (login, controller and database)
- CVMFS Stratum 1
- The DeepSquare Supervisor

